The Tulsa Homeowner’s Guide to Driveway Replacement
A cracked, stained, or uneven driveway doesn’t just look bad—it can be a hazard and detract from your home’s value. For homeowners in Tulsa, Bixby, and Jenks, replacing an old driveway is a smart investment that boosts curb appeal and provides decades of reliable use. But what does the process actually involve?
This guide breaks down the step-by-step process professional concrete contractors use to give you a brand-new, durable driveway. We’ll cover everything from the first call to the final cure, so you know exactly what to expect.
Why Choose Concrete for Your Oklahoma Driveway?
Before we dig into the process, let’s look at why concrete is the go-to choice for driveways in our area. The Oklahoma climate, with its hot summers and occasional freezes, demands a material that can stand up to the elements.
- Longevity: A professionally installed concrete driveway can last 30 years or more. It’s a long-term solution that withstands heavy vehicle traffic and resists wear and tear.
- Low Maintenance: Concrete driveways are simple to care for. An annual cleaning and sealing every few years is usually all that’s needed to keep them looking great and protected from stains and weather.
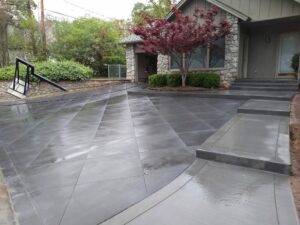
- Aesthetic Appeal: Modern concrete is far from boring. You can choose from various finishes, from a classic broom finish to stamped patterns that mimic stone or brick. The clean, solid look of a concrete driveway adds a polished feel to any home.
- Durability: Concrete doesn’t warp in the summer heat like asphalt can, and its rigid surface distributes weight evenly, preventing ruts and potholes.
The Driveway Replacement Process: A Step-by-Step Breakdown
Hiring a professional concrete contractor is the key to a successful project. An experienced team has the right equipment, understands local soil conditions, and follows a precise process to ensure your new driveway is built to last. Here’s what that process looks like.
Step 1: Initial Consultation and Planning
The first step is a meeting with a contractor at your home. This isn’t just about getting a quote; it’s a crucial planning session. During this visit, the contractor will:
- Assess Your Current Driveway: They will measure the area, inspect the condition of the existing surface, and identify any underlying issues like poor drainage or soil problems.
- Discuss Your Vision: This is your chance to talk about what you want. Do you need a wider driveway? Do you want a specific finish or color? Are there any drainage concerns you’ve noticed?
- Provide a Detailed Estimate: A professional quote will break down all costs, including materials, labor, demolition, and any special requests. It will also provide a timeline for the project.
Step 2: Demolition and Removal
Once you give the green light, the real work begins. The crew will start by demolishing and removing your old driveway. This is a heavy-duty job that requires specialized equipment.
- Breaking Up the Old Surface: Using jackhammers, sledgehammers, or even skid steers with breaker attachments, the team breaks the old concrete or asphalt into manageable pieces.
- Hauling Away Debris: All the broken material is loaded into a dump truck and hauled away for proper disposal or recycling. A professional contractor handles all cleanup, leaving you with a clear, excavated space.
Step 3: Site Preparation and Forming
This is arguably the most critical stage for ensuring the longevity of your new driveway. A beautiful finish won’t last on a poorly prepared base.
- Grading the Sub-base: The crew will level and compact the soil beneath the old driveway. Proper grading is essential to ensure water drains away from your home’s foundation and doesn’t pool on or under the new concrete.
- Adding a Gravel Base: In most cases, a layer of crushed gravel (typically 4-6 inches deep) is added and compacted. This rock base provides a stable foundation, improves drainage, and helps prevent the concrete slab from shifting or cracking over time due to soil movement.
- Setting the Forms: Wooden or metal forms are installed around the perimeter of the driveway area. These forms act as a mold, holding the wet concrete in place and defining the final shape and thickness of your driveway.
Step 4: Pouring the New Concrete
With the site perfectly prepared, it’s time to pour the concrete. A concrete mixer truck will arrive, and the crew will get to work quickly and efficiently.
- Placing the Concrete: The wet concrete is poured into the forms. The team uses shovels and rakes to spread it evenly throughout the entire area, ensuring it fills every corner.
- Screeding: A long, straight board called a screed is used to level the surface of the concrete, striking off any excess.
- Floating and Troweling: After screeding, the surface is smoothed using tools called floats and trowels. This process helps embed the larger aggregate (rocks) just below the surface and pushes a layer of “cream” (cement and sand) to the top for a smoother finish.
Step 5: Finishing and Curing
The final look of your driveway is created in the finishing stage, which happens just as the concrete begins to set.
- Broom Finish: The most common and practical finish for a driveway is a broom finish. A specialized broom is lightly dragged across the surface, creating fine grooves. This texture provides excellent traction, making it less slippery when wet—a key safety feature.
- Cutting Control Joints: The contractor will cut shallow grooves into the slab at strategic intervals. These control joints encourage the concrete to crack in a neat, straight line as it naturally shrinks and expands with temperature changes, preventing random, ugly cracks from forming across the surface.
- Curing: This is a vital, often misunderstood step. Curing is not just about drying; it’s a chemical process where the concrete hardens and gains strength. The contractor will often apply a curing compound to the surface. This slows moisture loss, allowing the slab to cure slowly and evenly for maximum durability. You will need to stay off the driveway for a period of time—typically 7 days for foot traffic and up to 10-14 days before driving on it.
Your Partner for a Perfect Driveway in the Tulsa Area
Replacing your driveway is a significant home improvement project. By understanding the process, you can feel confident in your investment. For homeowners in Tulsa, Bixby, and Jenks, choosing a local, reputable contractor who understands our soil and climate is the best way to ensure you get a high-quality, long-lasting concrete driveway that enhances your home for years to come.